


FAQS
Browse the categories below to find answers to commonly asked questions. If you don't find an answer to your question use the contact form above to get in touch anytime.
If you can't find what you need in our FAQ's below, please use the form below to contact us. We will respond as soon as possible.
Looking to become a retailer?
Go to our Retail Enquiry page here
Browse the categories below to find answers to commonly asked questions. If you don't find an answer to your question use the contact form above to get in touch anytime.
If you have a specific question relating to any of our products you can always contact us at info@peatys.co.uk no matter how technical! We are here to help you.
Unfortunately, due to some shipping rules, we cannot currently ship certain products & aerosols across your country. Sign up to our newsletter to stay up-to-date with these products becoming available.
WHAT SIZE GRIPS DO I NEED?
Your ideal grip size depends on your riding style, trail conditions, hand size, and whether you wear gloves or not. Selecting the right grip can be as much personal preference as it is a science.
As a general rule, most people normally opt for a thin grip, but generally people with bigger hands (XL glove size and upwards) should opt for a thicker grip.
However, some aggressive riders (even those with massive hands) may prefer a thin grip to achieve better bar feel and precise control. Conversely, people with smaller hands, who might otherwise be best suited to a thinner grip, may prefer the comfort and fatigue reduction of thick grips over ultimate control.
WHICH GRIP SHOULD I RIDE?
MUSHROOM
The mushroom texture gets its title by looking like the classic fins on the underside of a mushroom. Used for decades on BMX grips for its a to absorb impacts, each fin of a mushroom texture is evenly spaced with a gap the same width as the fin.
The user of this grip could be anyone from a trail cruiser looking for maximum comfort to big hitters looking to take the sting out of hideous rock gardens and flat landings.
KNURL
This firm classic has been used as a grip texture on tool handles for well over 100 years, and for good reason—a knurl provides an excellent, consistent, and aggressive grip.
The user of this grip would more likely be a racer who prefers this texture for its increased aggressive feel and precision control.
DOES THE COMFORT THUMB PAD WORK FOR ALL HAND SIZES?
Its shape has been finely tuned to find a sweet spot in size and location, catering optimally for small hands, shovel hands, and riders who prefer to position their hands either on the inside or outside of the grip while riding.
DOES THE THINNER BOTTOM AFFECT CUSHIONING?
No! The inward cut finger bars work alongside the offset core to reduce the depth of rubber on the underside as much as possible. This provides you with a solid feel to the finger bars and a much more positive feel direct to the bar with your fingertips when pulling up.
After all, there's no need for cushioning on the underside of a grip when all of the impact to your hands is coming from the top surface.
WHY USE A 20A COMPOUND?
Bike grips can come in lots of different rubber compounds, usually ranging from 30A down to 15A—the higher the number, the harder the rubber.
Our Monarch grips come in a 20A compound as standard, which strikes a balance right down the middle—soft and grippy for an awesome ride feel, yet durable enough to last!
A 30A grip is the most common compound specified on most new bikes. They’re firm and can be quite harsh to ride, but they wear out slowly and are less likely to tear if crashed.
A 15A grip is super soft and usually used for specialist race grips. These super soft grips are much grippier, and the softness helps to reduce impact on the hands, but with more friction comes more wear, so they will wear out quite quickly and can tear easily if crashed.
DO I NEED TO HAMMER ON THE GRIPS?
The core of our grip has been custom-made to take a thinner 8mm clamp rather than the more usual 11mm clamp. This is only a 3mm difference, but every little bit helps to maximize the grippable area (130mm) and minimize the overall width of the grip body on your bars.
To enable us to use this thinner clamp, we’ve also tapered the internal diameter of the core so the bar-end of the core is slightly smaller than the diameter of the bar. This means the grip bites onto the end of the bar and assists the clamp in preventing grip slip.
This does mean you will need to tap the grip fully onto the bar during installation, but it really is a tap with the palm of your hand—no need for a hammer!
Check out our installation video below.
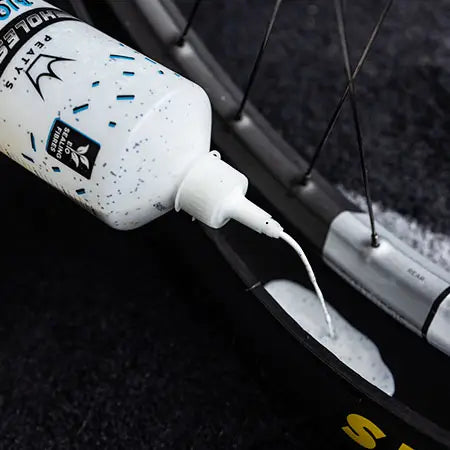
HOW MUCH SEALANT DO I NEED TO PUT IN MY TYRE?
As a general rule we recommend using 2ml of sealant for every mm wide your tyre is. So for example a 2.4" / 60mm wide tyre should have 120ml of sealant.
| Tyre Type | Sealant Quantity* |
| Road | 30 - 45ml |
| Cyclocross | 60 - 75ml |
| 26” MTB | 60 - 80ml |
| 27.5” MTB | 70 - 90ml |
| 29” MTB | 100 - 120ml |
*Quantities quoted per tyre. For wider rim / tyre combinations and / or additional puncture protection we recommend adding up to 30ml more sealant to the above quantities.
HOW LONG DOES TUBELESS SEALANT LAST?
Sealant can last up to (and a lot of the time beyond!) 6 months in your tyre in temperate climates. We recomend you to Always check sealant regularly and top up as required. Depending on how much you ride, and how warm it's been, we recommend checking your sealant every three months. For hotter climates or regularly ridden wheels check every month.
WHAT DO I DO IF I GET A PUNCTURE?
Most of the time just keep on riding and the sealant will do the hard work for you! Escaping air will always suck Peaty’s Holeshot Biofibre Tubeless Sealant towards a puncture, so most will seal while spinning. But if a big hole is still leaking, stop and rotate the wheel so it’s at the bottom and tap the tyre to rush maximum sealant to the right spot. For punctures on the sidewall of a tyre you may need to lean your bike over and tap the tyre on its side so the residual pool of sealant is sent to cover the hole.
DOES CO2 AFFECT TUBELESS SEALANT?
CO2 blasts out of the inflator head at around -50 degrees, so it will freeze any sealant that it comes into close contact with however, since our Holeshot Biofibre Tubeless Sealant formula is a water-based formula (which means the latex is suspended in water rather than chemicals) it will soon defrost and performance won’t be affected.
HOW DO YOU CHECK TUBELESS TYRE SEALANT?
The easiest way to check your sealant is to fully deflate your tyre and pop one side of the tyre bead off the rim so that you can see the inside of your tyre carcass.
What you're looking for is a good coating of sealant all over the inside of the tyre then a pool of residual sealant which gathers at the bottom of the tyre when left for a few seconds.
If you have a coating of sealant but no pool of residual sealant then simply add some more fresh sealant to your desired amount.
In the unlikely event your sealant has fully dried up (naughty you for not checking it for so long!) then you can simply re-add the correct amount of sealant as stated on our quantity guide and get riding again. This fresh sealant will help to rehydrate the old sealant and make it easier to remove from your tyre carcass.
Once you've checked the sealant - and topped up if necessary then simply pop the bead back onto the rim and re-inflate. Just be sure to wash away any sealant off the outside of the rim to prevent after re-inflating because it's not easy to remove once it's dry (it has to bond to rubber after all!).
DO I NEED TO WASH MY TYRE BEFORE ADDING SEALANT?
Yes, make sure you thoroughly clean the inside of your tyres of any dirt, oil and other sealants before you first setup tubeless. New tyres are often coated on the inside with a residual chemicals from the manufacturing process (specifically release agents) which can react with tubeless sealant and cause it to solidify prematurely.
Let the tyre dry fully after cleaning and wipe the tyre with Isopropyl Alcohol or our Disc Brake Cleaner before applying sealant.
DO I NEED TO REMOVE OLD TUBELESS SEALANT?
This heavily depends on what type of sealant you're already running.
Our new Peaty's Holeshot Tubeless Sealant is fully backwards compatible with our OG Tubeless Sealant, so you don't necessarily need to wash out old sealant when topping up with new Holeshot Tubeless Sealant.
However, if you want the full benefits and sealing power of the new Holeshot sealant then you should fully replace with Holeshot Tubeless sealant.
If you're using another brand of sealant then we can't guarantee our sealant's compatability, simply because we have no control over the chemicals and addatives they use.
Top tip: The caps on our aerosol tins are a perfectly sized scoop to scrape out old sealant. This sealant could then be re-used in a new set of wheels instead of being thrown away.
DO I NEED TO WASH MY TYRE BEFORE ADDING SEALANT?
In short, yes as long as your rims and tyres are tubeless ready, you can use tubeless sealant in road, gravel and cyclocross tyres.
WHY DO MY TUBELESS TYRES HAVE LITTLE WHITE DOTS ON THE SIDE?
Tubeless tyres rely on a thin lining of butyl rubber on the inside of the tyre to hold air (and sealant). Some new tyres (especially very thin / lightweight tyres) can have tiny imperfections in this lining making the tyre slightly porous, so it is normal for new tyres to show little spots of sealant on the sidewalls where sealant is having to finish off the job the tyre manufacturer started 😉
This is fairly normal and should seal within the first 24hrs but if your tyre continually leaks out of the sidewalls then contact your tyre manufacturer as there may be a larger fault with the tyres construction.
Porous tyres may absorb some sealant within the first few riding hours to help seal these tiny holes so it's best to check your sealant levels after two weeks of application and top-up any lost fluid if required.
WHAT LENGTH VALVES CAN I BUY?
They come in 42mm, 60mm and 80mm lengths.
HOW DO I INSTALL MY VALVES?
Do you really have to ask?! Ok ok the big man will show you how -
WHAT HAPPENS IF I SNAP A VALVE?
Get in touch with us through our warranty page and we will replace it with a new one free of charge providing you can provide a proof of purchase. We got your back!
WHAT IF I LOSE ONE OF THE VALVE CORE REMOVER CAPS?
Well you should have tightened it up properly then you jessy! That will learn ya. At least our smoked black valve cores look cool so you can still shred with confidence.
WHAT WIDTH TAPE SHOULD I GET?
Either look at the wheel spec to get the internal rim diamiter or measure the width with one of those measuring stick things. Your tape needs to sit snugly in the rim and cover the spoke and valve holes but not impede the edge of the rim walls where the tyre bead will need to sit.
Do you do any other colours of tape?
Stop being a pansy and go ride your bike!
How many wheels can I tape with a single roll of tape?
How do I install the tape?
Let the big man tell you how to do tubeless like a boss -
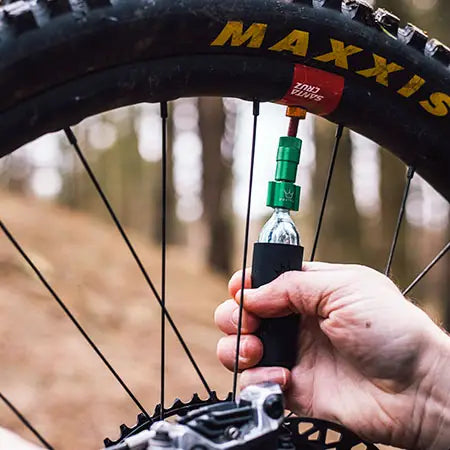
What pressure will a 16g or 25g CO2 canister inflate my tyre to?
The pressure you will be able to get from a 16g or 25g CO2 canister will heavily depend on your wheel size, tyre width, tyre depth and rim design (a rim with a big dip in the middle will create more volume to fill than a shallow dipped rim).
With so many variables it’s impossible for us to guarantee exactly what pressure you’ll achieve in your particular setup, but we’ve put together a table of wheel / tyre sizes below to demonstrate what pressures you’re likely to achieve with either 16g or 25g cartridges.
Recommended Size
| Wheel size | 16G | 25G |
| 29” x 2.4 | 21psi | 34psi |
| 29” x 2.1 | 30PSI | 45psi |
| 27” x 2.8 | 13PSI | 25psi |
| 27.5” x 2.4 | 25PSI | 40psi |
| 26” x 2.4 | 27psi | 41psi |
| Fat Tyre | - | 7psi |
| 700c 28c | 80psi | 120psi |
| 700c 23c | 125psi | Two tyres at 70psi |
Why does everything go freezing cold when I empty a cartridge?
When CO2 is highly compressed (870psi to be precise!) it becomes liquid. The process of turning liquid CO2 back into a gas is called an exothermic reaction. This means that the CO2 has to steal energy from somewhere else in order for it to turn into a gas - in this case it steals heat from the CO2 cartridge, the inflator head - anything it can get its energetic little mitts on! This is why it’s so important to always use the closed base freeze protector sleeve, so it doesn’t steal heat from your hands and give you freeze burns!
Does it matter if the Co2 inflator is pointing upwards or downwards?
Yes, this can make a huge difference in inflation time! CO2 canisters are full of liquid gas so if the inflator head is pointing downwards (6 o’clock position) then both gravity and the pressure inside the canister will be forcing the liquid CO2 out of the inflator head. This can result in full inflation times of under 10 seconds!
If the CO2 inflator is pointing upwards (12 o’clock position) then only the gas pressure inside the canister will be forcing the CO2 out of the canister. This will result in inflation times of between 10 and 20 seconds.
When pointing upwards, because you’re relying on only gas pressure, the canister will usually have a small amount of gas left even when the tyre is fully inflated. This is because the gas pressure between the canister and tyre have equalised. For example if the tyre pressure is 30psi in the tyre, you will have 30psi pressure left in your canister.
Sometimes my inflator head gets stuck on the valve?
If your valve stem has any moisture on the outside of it then this moisture can freeze solid when the CO2 gas is released. This moisture could then freeze to the o-ring on the inflator head and make it feel stuck, but fear not, just simply twist it anti-clockwise a few times as if you’re unscrewing a thread (to break the seal of the ice) and it should pull straight off again.
My inflator head has frozen and won't blow any gas?
If your valve stem has a restricted airflow (from a sealant blockage or has a partly closed or broken valve stem) this can cause a build up of freezing CO2 liquid or gas in the valve head which can - sometimes - cause the inflator head to freeze up (especially when inflating in a downwards position).
This can also happen if there is residual water inside the inflator mechanism.
Don’t panic, if this does happen, simply wait a few minutes for the ice to melt and the mechanism will move and blow gas freely again.
It is important to check your tubeless valves for any blockages as this will massively reduce C02 air flow into your tyre, and can lead to the gas spurting out of the inflator head. A quick clean out of your tubeless valve will fix this. Simply remove your valve core and unblock the valve by poking a small object through, something like a small allen key will do the job. Put your valve core back in and re-inflate your tyre.
WIll CO2 freeze my sealant?
CO2 blasts out of the inflator head at around -50 degrees, so it will freeze any sealant that it comes into close contact with however, since our Tubeless Sealant formula is a water-based formula (which means the latex is suspended in water rather than chemicals) it will soon defrost and performance won’t be affected.
If you are running another brand of tubeless sealant then please check with the manufacturer's guidelines to see if it is compatible with CO2 inflators before using.
Single use CO2 cartridges... Is David Attenborough going to hate me for using these?
Single use, yes … but fully recyclable. Just pop these in with your metal recycling and they’ll be made into something shiny and new again in no time!
IS CO2 Safe?
Yes, you breathe it out all the time. In one day, the average person breathes out around 500 litres of CO2 gas – which amounts to around 1kg in mass. By releasing 16g of CO2 then, you’ll be releasing the equivalent of around 20 mins of standard human exhaling.
CO2 is also commonly used for propelling fire extinguishers and inflating life jackets but most importantly carbonating beer.
How much does one full CO2 canister and CO2 head weigh?
A CO2 inflator head alone weighs 15.2g
A CO2 inflator head with a full 16g CO2 cartridge weights 83.8g
A CO2 inflator head with a full 25g CO2 cartridge weights 138.2g
How long will the Co2 stay in the canister once I have popped the seal?
Each CO2 inflator head is dual sealed to provide an excellent, durable seal. After popping a CO2 cartridge you can expect to lose only around 0.5g per month.
Will the inflator work with other CO2 canisters?
Yes, but they won’t have our unique fully enclosed sleeves so don’t blame us if you get frost burn.
How far should I insert the tubeless tyre plug?
We recommend inserting tyre plugs so that, when the fork tool is removed, there is around 10mm of excess plug left on the outside of the tyre. This will create a ‘bulb’ behind the puncture to hold the plug more securely when the tyre is pumped back up. It will also prevent the plug from being pushed inside the tyre while riding.
What's the best way to remove a tubeless plug from the plug sheet?
With our unique single-sided fork design you don’t really need to touch the plugs at all. Simply spread apart the plug sheets and - using the plugger tool like a fish hook - hook the plug straight out of the sheet! Doing it this way means you’ve less chance of ruining the sticky surface of the plug by touching it with your filthy fingers or gloves.
How do tubeless tyre plugs work?
Our tyre plugs are made from an extremely sticky butyl rubber compound. When inserted into a clean, dry tyre, these butyl plugs will stick to the rubber tyre and, providing the puncture is not too large, can create an airtight seal by themselves. On larger punctures you may see some tubeless sealant still escaping while the sealant then seals any remaining gaps. If inserted into a puncture which is surrounded by Tubeless Sealant then we recommend cleaning the hole as best as possible with the inbuilt reaming texture on the fork shaft to try and create a fresh dry surface for the plugs to bond to.
Can I use tubeless tyre plugs on road, gravel and cyclocross tyres with low knobbles or even slicks?
In short, yes You may use a tyre plugger on road, gravel and cyclocross tyres - You may just feel some small bumps for the first few meters with slick tyres until the plug ‘tails’ on the outside are flattened down.
Why aren’t your plug sheets made from paper?
We tried for a long time to use paper for our plug sheets but when riding in the rain, or removing plugs with wet fingers, the paper plug sheets can soon disintegrate and cover the sticky plugs with a fine film of paper pulp - rendering the plugs useless. Unusable plugs and an unfixed tyre are a far worse scenario for the planet - and for you out in the middle of the woods - so the greater good here was to use durable recyclable plastic instead.
My plug keeps firing back out of the hole?
If the plug will not stay in the hole then it could be that the hole is not clean / dry enough when inserting the plug or the puncture is too large for the hole.
Ensure that you use the reaming tool to clean and roughen up the hole before inserting a plug - this will enable the plug to grip your tyre better. If the hole is too large and you’re using 1.5mm plugs then try using a 3mm plug instead. If you’re already using a 3mm plug then you can try putting two plugs into one hole.
How can I load a plug into the tool for instant use when racing?
If you want to preload a 3mm plug for an instant fix, simply skewer it on the prong of the fork. That will keep it in place and the hole will ‘heal’ when it’s pushed into the tyre.
Can I buy refills of the plugs?
Yes you can get packs of 4 1.5mm or 4 3mm refills in the Peaty’s online shop or wherever you bought your plug tool.
Will the tool work with other plugs?
Yes you can use any other brand of butyl plugs if you need to but we spent extra time making ours work really well so you’ll get the best results using Peaty’s plugs.
Do I need to cut the plug down?
We pre cut our plugs so that you’ll just have a short tail outside the tyre, which will flatten down smoothly once you start riding. Cutting it down makes it more likely that the plug will come out (or fall into the tyre) later.
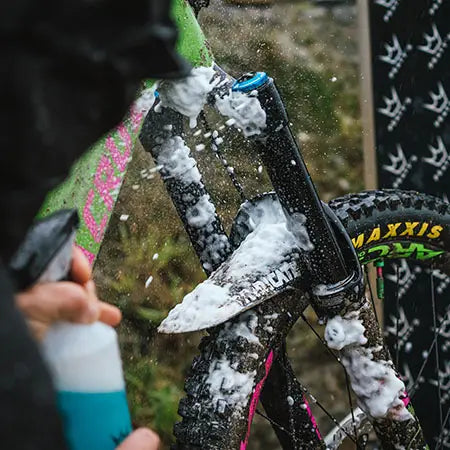
My bike is really dirty! Will this still work?
Yeah sure, just spray on and leave for a few minutes then rinse off. Give a quick once over with a brush if there is any really stubborn dirt.
How does this sprayer work?
There are two settings to your LoamFoam Spray head. Flip the cap open to activate the spray mode for general coverage. Close the cap for foaming spray mode to get in those hard to reach areas and really lift the dirt.
Can I spray it on my brakes and pads?
Yeah, crack on! Just rinse off properly as per the instructions on the bottle.
How do I make up a bottle of Loam Foam?
Are you serious? Its so on the bottle you have right there! Just pop 200ml LoamFoam Concentrate in a one litre LoamFoam bottle and fill up with water. Give it a shake. Easy as that! The dilution rate is 1:5.
Whats this gel in the bottom of my bottle?
We use organic thickening agents to get a really good cleaning experience. These can sometimes drop out of solution depending on temperature, sunlight and how long the bottle has sat still for. No drama though princess, just give the bottle a bloody good shake and get to it.
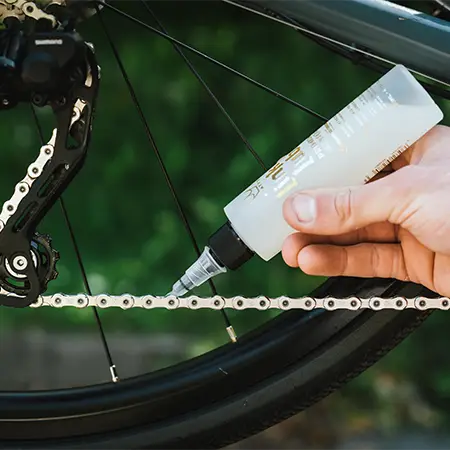
Where should I use Peaty’s Foaming Drivetrain Degreaser?
Are you having a giraffe? It says so in the title! Get this frothing grease destroying goodness sprayed onto your chain, mech and cassette, leave for a few minutes then rinse off.
Will this remove grease from my bearings?
Peaty’s Foaming Drivetrain Degreaser is specially designed to take the oil and grease off your chain but wont as readily attack waterproof bearing grease meaning you won’t have to maintain them as much. Your welcome!
For waterproof grease eating, badass XXX degreasing action check out our XXX Solvent Degreaser Aerosol
How should I apply this stuff?
The Peaty’s Foaming Drivetrain Degreaser has a foaming cap so you can either use a direct foaming spray or open it to get a wide spray.
What sizes does this stuff come in?
500ml and 1 litre only at the moment but you don’t need much of it to do a proper job
Whats this for then?
This is the ultimate bike specific degreaser that is designed to strip out all the grease from those bearings, bottom brackets, hubs and moving parts and leave you with a clean slate to start again with fresh grease.
Should I use it on my drivetrain?
You can do if you find yourself with a seriously stubborn build up of grease on there, but for regular drivetrain maintenance check out our Foaming Drivetrain Degreaser.
Why is it call XXX?
Because its absolutely hardcore! Just ask your mum!
Is there anything I should consider when using this degreaser?
Avoid contact with brake pads, disks, eyes and skin also use in a well ventilated area to prevent inhalation.
How do I use this stuff?
Spray it on your brakes and pads in a well ventilated area and leave to dry completely. Rub over with an immaculately clean microfibre cloth or blue roll if you really need to. It's also good to use in areas you want to degrease but leave no residue behind such as when stripping out bearings, fork seals and other bits.
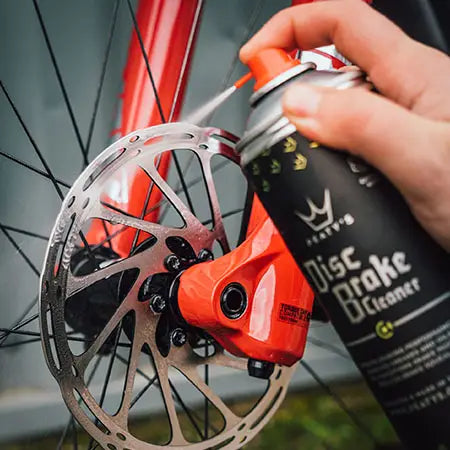
Why should I use this stuff?
Far from just IPA in a tin, this is a finely balanced brake cleaner made specifically for bikes.
It contains a complex blend of polar and non-polar solvents to remove both organic and inorganic soils. IPA itself, while being good as a light duty degreaser on electronic components, is a poor solvent for dissolving many oil based soils. If you get contaminants on the disk then give them a good spray over with Peaty's Disc Brake Cleaner to improve braking performance.
You can sign up for an account here, and sign up to our newsletter here.
No, you do not need to create an account in order to place an order. You can checkout with your contact and shipping information as a guest. However, we recommend you create an account in order to track your order easily, get email offers, special coupon codes and the latest news from Peaty's.
You can easily unsubscribe to our newsletters by clicking on 'Unsubscribe' at the bottom of the email itself.
We pride ourselves on processing your order as quickly as possible. Once the order has been received by our warehouse we can no longer cancel or change an order. Please contact us at websales@peatys.co.uk as soon as you realise you need to make a change or cancel, and we will try to service this request.
Once you have added products to your basket, you will be able to add a discount code. At the top right of the page, click on the basket icon and then click 'Checkout Now'. Within the checkout, you will be able to enter a discount code on the right and be able to click 'Apply'. If the discount code is valid you will see in confirmation.
Firstly double check the spelling, and format of the code to make sure it is correct. We recommend that you check the valid-through date to ensure that the discount code is still valid. Some discount codes do not work in conjunction with other offers. If the promo code is still valid, please contact us at websales@peatys.co.uk for assistance.
Our discount codes only work on full-priced items, unless otherwise stated.
We ship worldwide!
For UK, EU and ROW orders, please use this website.
For United States orders, please use peatys.com
For full information, please visit our Delivery Information Page.
We offer FREE SHIPPING OVER £30.
Standard shipping is £5.
For full information, please visit our Delivery Information Page.
Please note that all prices shown include UK VAT. However, for international transactions, you will not be charged UK VAT.
At checkout, once you complete your address details and proceed to confirming your order, the final price you are charged will be lower than the RRP of each product as VAT will have been removed. Peaty’s will not charge you UK VAT for any order destined for outside of the UK. However, your order may be subject to local import taxes, duties and fees imposed by your country once your package arrives in the destination country. It is your responsibility to comply with the laws of your country and to pay any necessary taxes, customs clearance fees, charges or duties which your package may be subject to. Peaty’s accepts no responsibilities for these charges.
We aim to keep everything in stock but occasionally some products sell out. In this instance, add your email address to the 'Notify When Back In Stock' form, making sure you submit it successfully. You will then receive an email when this product is next available.
If the form is not shown, the product may not be available in your country. In that instance, please see below.
Unfortunately, due to some shipping rules, we cannot currently ship certain products & aerosols across your country. Sign up to our newsletter to stay up-to-date with these products becoming available.
We pride ourselves on processing your order as quickly as possible. Once the order has been received by our warehouse we can no longer cancel or change an order. Please contact us at websales@peatys.co.uk as soon as you realise you need to make a change or cancel, and we will try to service this request.
Orders placed before 1pm are typically dispatched the same day and are placed on a DPD next day service. This is not guaranteed however.
If you require next day, please choose a next day service. Next day orders shipped on Friday will be delivered on the following Monday. We do not offer Saturday delivery.
Orders placed after 1pm will be dispatched the following business day. Orders placed on the weekend will be shipped out the following business days. Please note we do not ship on weekends or bank holidays.
The Channel Islands, Isle of Man, Northern Ireland, Scilly Island, and the Scottish Highlands and Islands are excluded from the Next Day service. Orders placed on these are on a 2-3 day service.
For full information, please visit our Delivery Information Page.
Please see your shipping confirmation email for a link with how to track your parcel. If you cannot find this information, please contact us at websales@peatys.co.uk with your order number and we will be able to provide you with the latest shipping information.
You will receive an email with tracking details as soon as the order leaves us (and / or text message if you provide us with your mobile number).
If you are having trouble with your parcel not arriving as expected, please contact us at websales@peatys.co.uk with your order number and details of the issue you are having.
If you believe your goods are faulty, please go to our Warranty page and fill in our warranty form before returning your item. Please include any information and images outlining any defects or damage.
If you are unhappy with your purchase, you have 30 days to return your items to us.
To be eligible for a return, your item must be unused and in the same condition that you received it. It must also be in the original packaging.
If 30 days have gone by since your purchase, unfortunately, we can’t offer you a refund or exchange.
Several types of goods are exempt from being returned. Perishable goods cannot be returned.
Additional non-returnable items:
To complete your return, we require a receipt or proof of purchase.
Please visit our Returns Policy page for full information.
If you have ordered an item of clothing and it is the wrong size, please ensure the item is returned in an unused condition in it's original packaging. In order for us to process an exchange as quickly as possible, please re-order the new correct size as a new order and we will refund the original order (incorrect size) once it is received back to our warehouse.
Outside of clothing, we only replace items if they are defective or damaged.
If you need to exchange it for the same item, send us an email at websales@peatys.co.uk.
Once your return is received and inspected, we will send you an email to notify you that we have received your returned item. We will also notify you of the approval or rejection of your refund.
If you are approved, then your refund will be processed, and a credit will automatically be applied to your credit card or original method of payment, typically within 7 working days.
If you haven’t received a refund yet, first check your bank account again. Then contact your credit card company, it may take some time before your refund is officially posted. Next contact your bank. There is often some processing time before a refund is posted.
If you’ve done all of this and you still have not received your refund yet, please contact us at websales@peatys.co.uk.
No, only products purchased from our site can be returned to us. All orders from other retailers will need to be returned to the retailer you orginally placed the order with.
For UK and rest of world customers, please complete this returns form, and mail your product to:
Peaty's Returns
Unit 1 Rhosddu Industrial Estate
Wrexham
LL11 4YL
UK
For US customers, please complete this returns form, and mail your product to:
Peaty's Returns
c/o Selery Fulfillment
1809 W Frankford #160
Carrollton, TX
75007
United States
Please note:
You are responsible for paying for your own shipping costs for returning your item. Shipping costs are non-refundable.
If you are shipping an item over £50/$50/€50, you should consider using a trackable shipping service or purchasing shipping insurance. We don’t guarantee that we will receive your returned item.
We are pleased to offer an extended returns window for the holiday season.
For all purchase made on or after Tuesday, November 25th, 2025, you will have until 30 days from Christmas Day, December 25th, 2025, to return your items to us*.
This is to offer you peace of mind when your buying gifts for riders this festive season.
*All other conditions of our standard returns policy apply. This means that to be eligible for a return, your item must be unused and in the same condition that you received it, and it must also be in the original packaging.
Thanks for your interest, we're always looking out for great riders to represent Peaty's.
Feel free to drop us any rider profiles and up-to-date race results to sponsorship@peatys.co.uk, and we'd be more than happy to take a look. Please note, we can't always respond due to the amount of requests received.
Interested in distributing Peaty’s or stocking us in your shop?
Contact us on our Retail Enquiry page.
